Utilize Range of Vendor checks to streamline payments to AP Vendors by selecting multiple vendors and capturing and paying all invoices due. See Specific Vendor Checks for information on paying individual Vendors or invoices. The steps to create a Range of Vendor Checks include
- Verify all Invoices have been entered. See Enter Unpaid for more information.
- Choose the Bank Account, set the check date and Invoice Due Date to retrieve unpaid invoices. See below for details.
- Use the Output Type of Proof Report to review vendors and invoices to be paid.
- Calculate the Range of Vendor Checks with the Output type of Proof Report.
- Use the Proof Report to review the vendors and amounts to be paid.
- Remove a Vendor or specific invoices using the Vendors button.
- Re-run the Proof Report and review, if necessary.
- Change Output type to Checks.
- Click Print to generate AP Vendor Checks.
| Access |
| Grant permission to User Profiles in Access User Profiles > select a User Profile > Security > Accounts Payable > Menu Security > Documents > Range of Vendor Checks. |
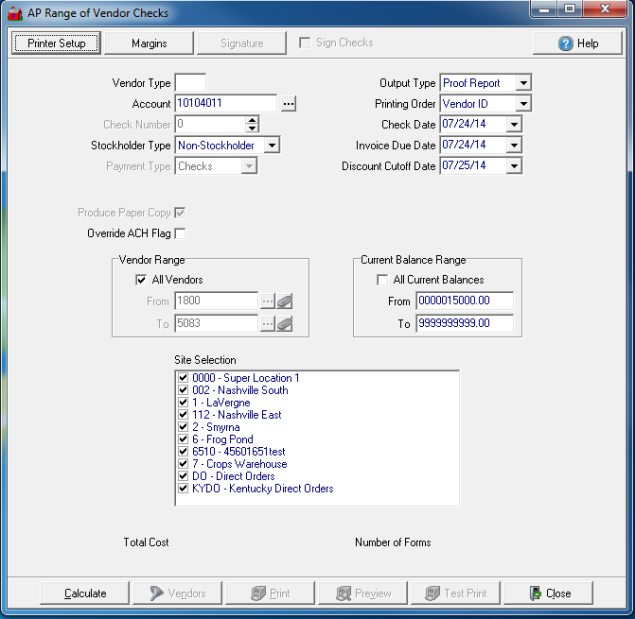
Enter a Vendor Type if using, found in the Vendor Type field on the Vendor account. If blank, all Vendors will be included.
Indicate the Bank Account the checks will be written against. Click Search to select a different bank account. 
Check Number will defaults to next available check number for the bank account selected.
Select Stockholder Type of Stockholder or Non-Stockholder.
Payment Type will defaults to checks.
Select the Output Type
- Proof Report- Begin all Range of Vendor checks by selecting Proof Report to view the Vendors and amounts that will be paid.
- Checks- Select Checks when ready to print actual checks.
Select a Printing Order of either
- Vendor ID
- Vendor Name
The Check Date defaults to the current date. Select the drop down calendar to choose an alternate date.
Invoices due on or before Invoice Due Date will be included in the checks printed.
Select the Discount Cutoff Date for the checks.
Override ACH Flag is used to include AP Vendors that have Pay by ACH selected on their accounts.
Select All Vendors or set a Vendor Range. To create a check for one AP Vendor, see Specific Vendor Checks.
- From- Enter a starting AP Vendor ID or select to search.
- To- Enter an ending AP Vendor ID or select to search.
Create a range of vendor checks by the Current Balance Range by selecting a range by entering an amount in the From and To field.
Use Site Selection to select all or specific Sites.
Total Cost populates after Calculate has been selected. This is the total amount for the checks to be written.
Click  to retrieve and total vendor invoices ready for payment.
The Number of Forms populates after Calculate has been selected. Indicates the number of checks to be written.
 - Active after Calculate has been selected. Use Vendors to exclude a Vendor from the check run or select specific invoices for payment. Learn more on about choosing the vendors or invoices here.
 - Print your Proof report directly to the default printer. Select when the Output Type is set to Checks to Print the checks.
 - View the Proof report onscreen. See a sample here.
Modify Vendors from Range of Vendor Checks
After reviewing the Proof report, Vendors can be removed from the check run. Select the Vendors filter to access the Vendor list.
Create Checks for Range of Vendor Checks
After modifying the Vendors included, if necessary, and running a Proof Report, to generate the checks hange the Output Type to Checks.
Select Test Print  to view the layout of how the checks will print.
Select Print which sends all checks to the default printer. Once this process finishes, the check information is written to the AP Vendor account.